Monday, September 22, 2008

Modeling - HardSurface

Hardsurface modeling is all the armor, weaponry, vehicles etc.  I wasn't sure how to get proper normal details on a low poly mesh.  I have tried doing mechanical detailing in ZBrush, and I mean proper detailing; multiple parts, joints, nuts & bolts etc. not just the typical stencil and masking techniques.  The method needs to be rework easy, if I want something in the design changed, I need to be able to do it, without complete re-UV, re-texture, re-skin.

This part of the process can actually be sub divided into high-poly and low-poly modeling, as each of them come with their own set of head aches.  The UV and texturing part is done only on the low poly version, and with the aid of base diffuse, normal and occlusion maps.. the texture painting is one of the easy parts.

The workflow is by no means my own, but I had to search long and hard to find proper tutorials on this matter.  The best resource I found was d'Artiste Modeling 2, where Kevin Lanning discuss their character workflow for Gears of War.  The only thing I had to adapt was the Max / Maya difference.

Here is brief overview of the hardsurface modeling workflow.

Sunday, September 21, 2008

Modeling - Organic

I used the modeling setup that is used by Epic in UnrealEd.   I want to use the character in the Make Something Unreal contest, and they know pretty much exactly what they're doing, so I might as well learn from them.

So I will model the character in 5 separate pieces, head, torso, arms, legs and boots.  I did the organic pieces first, seeing as I'm quite familiar with the workflow. 

  • Low poly mesh in Maya
  • Check edgeloops
  • Import Zbrush
  • Sculpt
  • Paint textures in Zbrush
  • Export lowest division to Maya
  • Layout UV's
  • Import to Zbrush
  • Texture to UV
  • Generate maps

Although ZBrush is great for generating normal/ diffuse/ tangent /displacement maps, I have done a few tests on organic models with Maya's Transfer Maps where I import a high poly mesh into Maya, and it is very capable indeed. This means if I need to do something like a cyborg or machineflesh character, I can sculpt the fleshy parts around the mechanical parts in ZBrush and import that into Maya, and do a low poly cage around both, and generate proper  maps on one mesh/UV set.

I modeled the head and the arm in Maya, kept it low poly but leaving enough geometry for proper deformation on places like the elbow, shoulder and neck.  Here is some angles of the head in ZBrush.

Saturday, September 20, 2008

Dude... concept

Usually I don't name my characters, but it only seemed fitting to name my first game character something catchy and exotic, like... George or something.  After about 2 days, I had to save my file/project as something, so I just went with "Dude".  There were plans on changing it later... but it stuck, and since then Dude has been the subject of quite a few experiments.

I had to start somewhere so I pulled in a few existing body parts, cut them up, and arranged them in a typical T-pose.  Nothing hectic, but it's always better than staring at an intimidating blank canvas.  Here I sort out the proportions of the character, which will differ on the character and style of it.  This is basically just placing the parts at key points, head, hands, feet and belly button.  The size of the head in relation to the body is always a good way to give the character size.  With the head just a tad smaller than the 7 and 1/2 head rule, the character appears a bit bulkier.

Cool, with that done... You would think to quickly take a screen grab of the body into Photoshop, and starting painting some serious armor.  But nope, not me... who needs concept work!! I spent like 3 weeks trying to model armor on the body without any concept work, by looking at a crapload of images in my library.  Modeling  different pieces from different images, and although I built quite an extensive library of armor pieces; Dude looked like a clown, and I had trouble going into public with patches of hair missing.

Lesson learnt. Print screen. Paste Photoshop. Feng Zhu.  I watched a few cool character tutorial dvd's by Feng Zhu(Designing fighting robots).  Back to design principles, started with original shapes, check silhouette.  Apply rule of three's. Major shape, Smaller shapes, detail shapes.

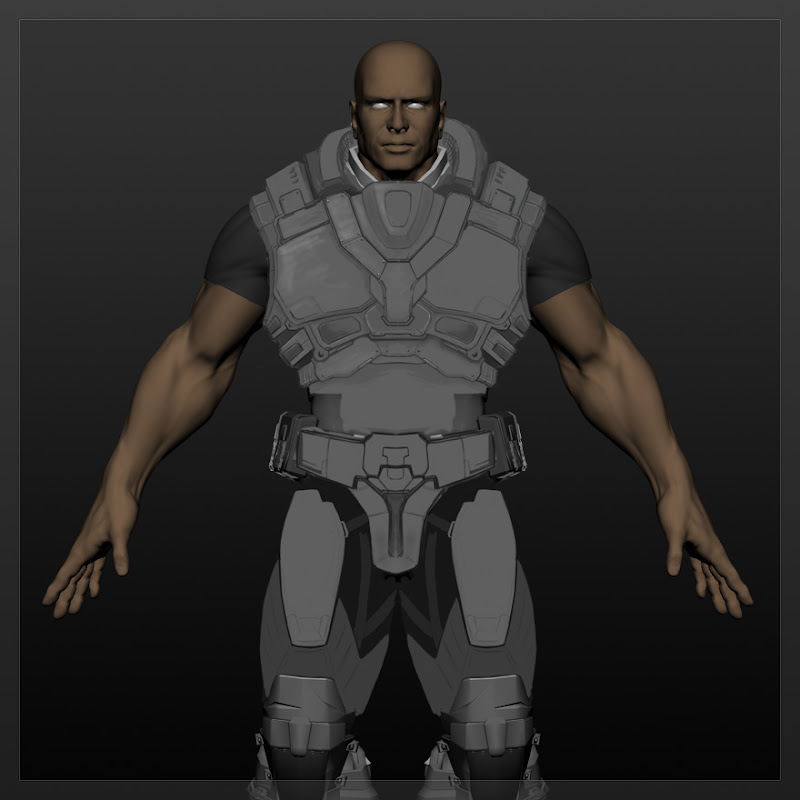
I started with a few rough shapes, playing around, but what usually happens when I draw characters is that I automatically go into "character mode", and I start drawing anatomy.  So the armor for Dude is basically an ergonomic extension of the human form, worn externally to protect every muscle... plate by plate.  Or as I like to call it... "Need to do research on Robots". 

On a technical note, I painted one side of the armor, and mirrored it over to the other side.  The character needed to be able to move in the armor, and there still wasn't any restriction on the animations, so he needed to be able to do any range of movements. I kept the shoulders open, to not have to worry about armor articulation, no armor on the stomach region, this is for deformation and silhouette purposes, to give the proper V-shape. The overall shape of the body in relative normal proportions. For normal/diffuse/occlusion map generation I needed to keep the details of the armor to still keep the shape of the "whole", as I will need to build the low poly mesh cage to project the details on.  Even though this is still the concept stage, it will save a lot of time and problem solving later on to just think about it when designing.

Getting started

This is probably one of the most difficult and fun stages of the development process, just because of the fact that in the beginning, anything goes!!  This involves delusions of grandeur, plotting the end of the world, scheming up what the guy would look like that will be able too pull it off while laughing at his own evil genius.  Every one of the intense gunfights are planned and choreographed(with all the added sound effects and grunts).  Intro's, cut-scenes etc.

Then reality kicks in, and we realise it is just two of us, so we settled for one character and one part of one of the levels.  We knew the character needed to be in the "game" at a fair poly count, running around looking all cool and stuff, showing off impressive coding.

Background

This blog was created to record my progress and workflow for creating a high quality or next gen game character. I’ve done quite a few 3d commercial and character projects in the past, but this is the first game character that I’ve done...  and I really need to get into the gaming industry, so there were quite a few technical and workflow issues that I needed to sort out.

One element of the process that I wanted to sort out properly was hard surface modeling. Sculpting packages such as Zbrush and Mudbox have made high detail organic modeling quite easy and the workflow have become much more natural. Looking at some of the high detail characters done by Epic Games for games such as Gears of War and UT3, all of the armor and hardware are extremely detailed, but is obviously not sculpted.

This character will be used in a number of technical demo's for Torque Game Engine Enhancement by Gerhard Botha; Just have a look at the crazy stuff he did on tgeaenhanced.blogspot.com